

Exploring EVO Max Series' New Features With V1.9
Drone Blogs
2025-04-29

Aloft Air Control Integration
Aloft Air Control enables live telemetry and automatic flight log imports for EVO Max Series now!
Instructions:
1. Aloft Website
Register an account on the Aloft website
Navigate to Manage > Connections > ADD CONNECTION
Select Autel > Autel Live Telemetry and Flight Imports > ADD
Copy the generated API TOKEN from your new connection
2. Autel Smart Controller
Open Enterprise App > Menu > Flight Logs
Tap the Sync icon (top-right corner)
Select Aloft Air Control and enter your API TOKEN
ap Login to complete authorization
You are now connected to Aloft Air Control. For live telemetry viewing on the Aloft website, ensure you have a stable internet connection. Completed flight records will automatically upload to Aloft when the controller has internet access.
Aloft Web Page
EVO Max Controller
Cloud Service - Remote Controller
The Cloud Service feature enables users to access live aircraft feeds through the Autel Integrated Command System (AICS).
Instructions:
1. AICS
Log in to AICS
Navigate to Assets
Add your:
Add your:
Site
Remote Control
UAV
Select Cloud Service Configuration (top-right corner of the Assets page)
Retrieve the:
MQTT address
MQTT Account
MQTT Password
2. Smart Controller
Ensure the remote controller is connected to the internet
Go to Menu > Cloud Service
Enter the MQTT credentials from AICS
Click Connect to log in to AICS
View your remote controller and aircraft in Realtime via AICS
Cloud Service also provides Situational Awareness, Live Streaming Feature, Map Elements, Media Management, Route Management, HMS Management, and Command Flight. For more information about the Cloud Service feature or Cloud API, please visit:
https://doc.autelrobotics.com/cloud_api/en/30/30/10
Note:
Supported models: EVO Max series with firmware V1.8 or V1.9
AICS version: V1.3.1 or above
Autel Enterprise App version: V2.4.15 or above
One remote controller can only control and stream from one drone at a time.
Autel Cloud API is available for third-party platform integration.
AICS
EVO Max Controller

RTMP/ RTSP Live Streaming
RTMP and RTSP now support single-camera or multi-camera live streaming.
Instructions
1. Go to Menu > Live Stream
2. Select either RTMP or RTSP, and then choose between single-camera or multi-camera mode.
Single Camera: Single mode allows streaming only one live feed at a time, with the option to switch cameras during the live stream.
Multi Camera: Multi mode allows streaming 1 to 3 live feeds simultaneously, enabling viewers to watch different cameras at the same time without switching
3. Input the stream URL provided by the third-party player.
4. Tap Start to begin the live stream.
Note:
The Live Stream feature does not support simultaneous multi-aircraft streaming when using the A-Mesh feature.
PSDK Integration
We now support Payload SDK (PSDK) for EVO Max Series running firmware V1.9 or higher. PSDK is a developer toolkit that enables seamless integration and control of custom payload devices on compatible aircraft. For more information about the PSDK, please visit:
https://developer.autelrobotics.com/doc/payload_sdk/v1/psdk_docs/en/9/1
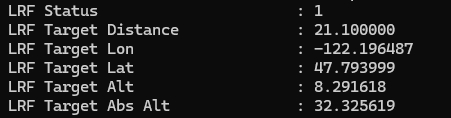
Laser Rangefinder Data in Photo Metadata
When viewing aircraft-captured photos with XMP (Extensible Metadata Platform)-compatible tools, users can access laser rangefinder data including Laser Rangefinder status, distance, latitude/longitude coordinates, MSL (Mean Sea Level), and ATL (Above Takeoff Level) – though these fields will appear empty if the laser rangefinder was disabled or outside the operating range.

Laser Rangefinder Data Sharing in A-Mesh
When using A-Mesh with multiple controllers, member controllers will automatically display the laser rangefinder data in their camera views when the lead controller activates the laser rangefinder.

Target Recognition Audio Alert
When target recognition is enabled, the remote controller emits an audible alert upon detecting a target.
Instructions
1. Go to Menu > Settings > More > Target Recognition Settings
2. Turn on the Audio Alert
3. Turn on RECOG feature
Custom Geofence
Users can create custom circular or polygonal geofences and no-fly zones to restrict and manage the aircraft's flight area.
Instructions
1. Go to Menu > Geofence.
2. Enter a Name, select the Type (Geofence or No-Fly Zone), set the Validity Period, and choose the Shape (circular or polygonal).
3. Tap on the map to define the custom area and configure its parameters.
4. Tap Save to apply the geofence settings.
5. The custom geofence will be saved in the Mission Library for future access and management.
Note
The aircraft will be prohibited from taking off inside no-fly zones or within buffer zones.
Missions cannot be set outside of geofences , inside no-fly zones, or within buffer zones.
MYou can view, edit, delete, enable, or disable saved geofences in the Mission Library.
When the aircraft is in flight, you cannot add, edit, delete, enable, or disable geofences.
When the aircraft is connected and on the ground, the remote controller will automatically sync its geofence data to the aircraft.
Article by Autel Robotics all rights reserved.