


Frequently Asked Questions
EVO Max series latest firmware V1.8.2.237
-
The Remote Controller update fails via OTA.
The new firmware version has been released for the EVO Max series on August 5th.
Aircraft: V1.8.2.237
Remote Controller: V1.8.2.237
APP: V2.1.119If the Remote Controller (RC) version is not V1.8.2.237 after updating via OTA, please manually update using the RC firmware provided below.
[Where to download the V1.8.2.237 RC firmware]:
Click here to download the firmware
https://drive.google.com/file/d/1CF2bPYB_rA1wvV7EXcF0km6TH8AfbfcR/view
[How to update Remote Controller by USB drive/card reader]:
Click here to check the video guidance
1. Format a USB drive and copy the "RC79.uav" file into it. (FAT32 or exFAT Format.)
2. Turn on Remote Controller (RC) and wait for 1 minute and then insert USB drive.
3. Click "Confirm" to enter the upgrade interface, and then click "Update All".
4. Wait for the progress bar to 100%. Restart the RC and check the firmware table in Settings.
5. If the upgrade fails, unplug the USB drive, restart RC, and upgrade again. -
Important Update Notes
The new firmware version has been released for the EVO Max series on August 5th.
Aircraft: V1.8.2.237
Remote Controller: V1.8.2.237
APP: V2.1.119Important Update Notes:
1. After completing this update, the aircraft update progress may still show less than 100%. If the rear arm light is steadily on with a green light, it indicates that the device has successfully completed the upgrade. Please restart the device to check the new version.
2. After updating to V1.8.2.237, it is not allowed to revert to previous firmware versions.
3. After updating to V1.8.2.237, please ensure that the Loudspeaker and Spotlight Combo if you have are also updated to the latest firmware version to fully utilize all features.
Download address: https://www.autelrobotics.com/doc/loudspeaker-spotlight-combo/
Autel Dragonfish [V3 Firmware]
-
Which hardware versions of Autel Dragonfish are not compatible with [V3 firmware]?
If your Autel Dragonfish hardware version is V6 or V8, it will not be compatible with [V3 firmware].
Currently, there are three hardware versions: V6, V8, and V9. You can check the hardware version through the base station's serial number (SN) as below:
SN begins with SD1 or SD2: V6 or V8.
SN begins with SD3: V9. -
I have an Autel Dragonfish with V6 or V8 hardware. Which APP version should I use?
Take the Dragonfish Standard as an example.
If it is V6 or V8 hardware, the corresponding firmware package: V0.1.4 (V6), V2.0.11 (V8). The corresponding APP version: V2.0.64.
-
I have an Autel Dragonfish with V6 or V8 old hardware, but my APP version is 2.0.80 or newer. Can I still fly it?
In this case, please stop flying immediately. Ensure that the base station, APP, and Dragonfish body are all using the same firmware package to safely operate.
Please contact official after-sales service as soon as possible to downgrade the APP version to 2.0.64:
1) Enter the remote controller system settings.
2) Select "Applications."
3) Locate the "Voyager" application.
4) Click "Uninstall Updates."
Note: Uninstalling the APP will erase the original flight route data. Before uninstalling, you can export the flight route data and upload flight records as a backup.
5) Manually install APP version 2.0.64.
-
My Autel Dragonfish hardware version is V9. How do I upgrade to the latest [V3 firmware]?
Please ensure that your base station serial number (SN) begins with SD3, then follow the upgrade prompts in the APP.
The usual upgrade sequence is: APP → UAV firmware → base station → Android system.
-
Where can I find instructional videos and user manuals for the Autel Dragonfish [V3 firmware]?
After updating to the [V3 firmware], please check the new user tutorials from the new Voyager APP to better understand and use the V3 version.
EVO II V3 series latest firmware V1.1.78
-
Firmware Upgrades for EVO II V3 Series.
Announcement on Software and Firmware Upgrades for EVO II V3 Series Aircraft in the EU and UK
Dear Customers:
Greetings,
In compliance with EU and UK regulations and to ensure a better flying experience, we will implement software and firmware upgrades for the EVO II V3 series aircraft used in the EU and UK on July 12, 2024. We strongly recommend that you perform this update to meet the regulation compliance requirement. The specific versions are as follows:
Autel Explorer APP Version: V3.1.107
Aircraft Version: V1.1.78
Remote Control Version: V1.3.9.15
New Features:
- Added Pairing method: Double click battery power button to enter pairing mode.
Bug Fixes and Optimization:
- Optimized video transmission feed performance;
- Optimized No-fly zone function;
- Optimized Remote ID function required for EU and UK legal compliance;
- Optimized HDMI function;
- Fixed GPS update error issue;
- Fixed other known issues.
Upgrade Steps and Precautions:
- System Upgrade Notification: When your aircraft is connected to the network, the system will automatically prompt you to upgrade. We recommend that you complete the update to ensure optimal performance and safety of the device.
- Check Current Version: If you do not receive the OTA push for this version, please first check whether the current firmware version is V1.1.56 or above. If it is below V1.1.56, please upgrade to that version or above to receive the OTA push for this version.
- During the Upgrade: Ensure that the device has sufficient power and maintain a stable network connection during the upgrade process. Do not disconnect the power or network during the upgrade to avoid failure or device damage.
- After the Upgrade: Restart the device and conduct a test flight to ensure that all functions are operating normally. If you encounter any issues, please contact the Autel Robotics customer support team promptly.
Precautions:
Do not perform firmware upgrades during flight.
Ensure that the upgrade is carried out in a safe environment to avoid any potential interference.
Follow the prompts strictly to avoid device malfunction due to improper operation.
If you have any questions or need further assistance, please contact us through the following channels:
Email: support.eu@autelrobotics.com
Official Website: https://www.autelrobotics.com
Thank you for your continued support and trust in Autel Robotics.
Happy flying!
The Autel Robotics Team
Important Precautions for Battery Installation.
-
How to Properly Install the Battery? - EVO Max Series.
The proper installation of the battery is critical to the safe operation of the drone. Below are the important precautions for installing the battery.
Correct Installation Steps:
Securely Insert the Battery:
Apply appropriate force to push the battery into the connector until you hear a "click" sound. Check the battery gap to ensure both sides are fully inserted and the battery is locked (see attached diagram).
Note: When handling the aircraft, please be careful not to accidentally press the latch buttons on either side of the battery.
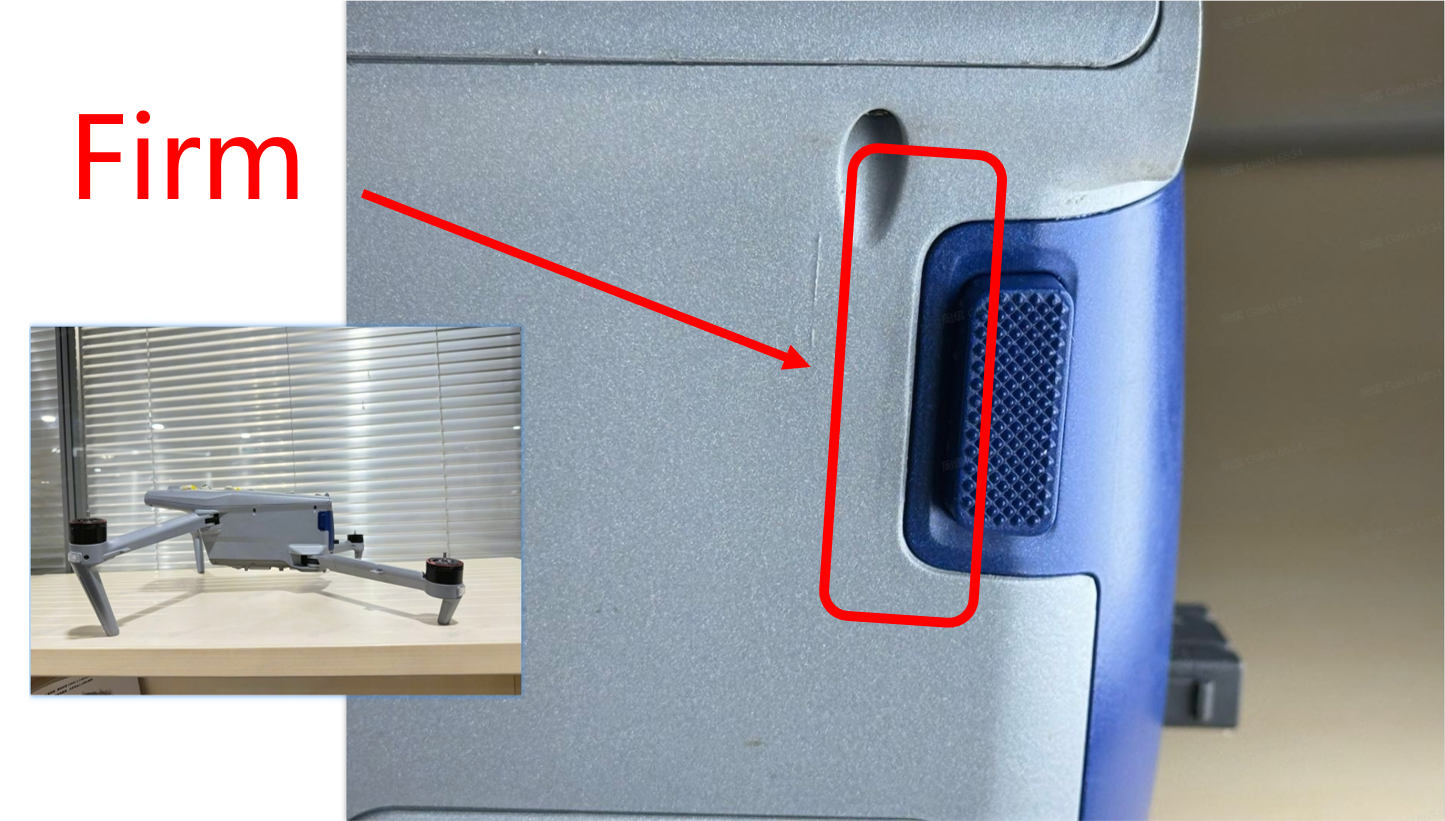
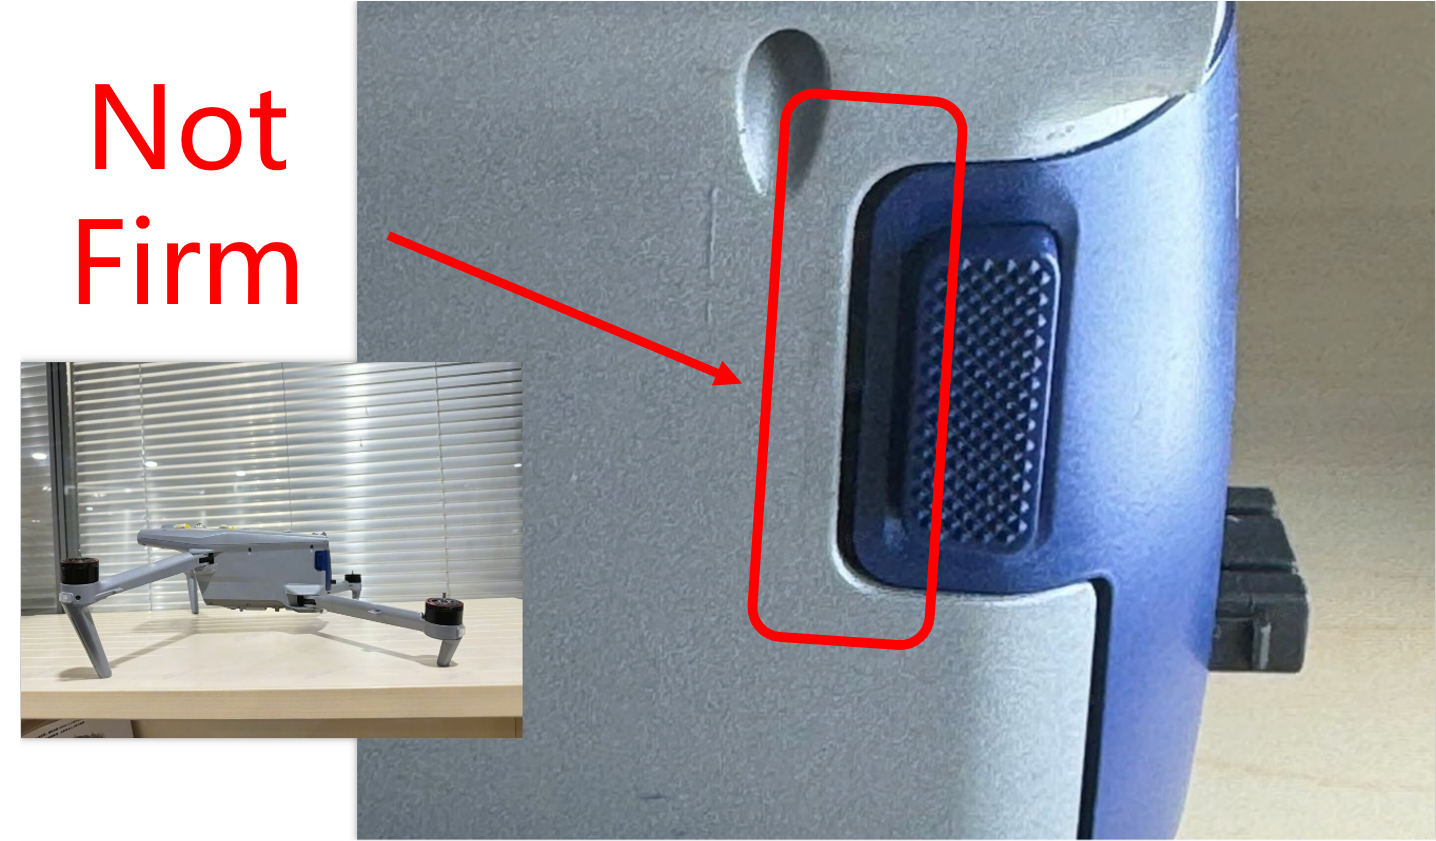
Check for Firmness:
Gently pull the battery to confirm it is securely fastened to the drone and cannot be easily moved. Check the battery gap again to ensure the battery is locked.
Pre-Flight Check:
Turn on the drone power and check if the battery level is displayed correctly. Conduct a short test flight to confirm the battery is installed correctly.
Other Precautions:
Pay special attention to battery installation and usage when operating in cold or high-temperature environments.
Regularly inspect the wear and tear of the battery connector and the drone connector.
If any abnormalities are found with the battery (e.g. Warning message to swap the battery), please stop using it immediately and contact customer service.
How to extract the logs
-
How to extract the logs? (EVO Max series)
For EVO Max series :
[Extract flight logs, image transmission logs, and camera logs from Aircraft body] :
Video guidance:
Click here to check the video.
1. Format an SD card, and create a txt file.
2. Rename it to "autel_log".
3. Delete extension name ".txt", choose confirm.
4. Power on the drone and wait for 2 minutes. Then insert the SD card into the slot.
5. Wait for 15 minutes (The log will be loaded into the folder automatically).
6. Then remove the SD card.
7. Put the SD card into a card reader. Connect the card reader to your computer.
8. Copy the files named [AutelLog-air.tar] and [AutelLog-cam.tar] and send to us.
[Extract remote controller logs from Remote Controller] :
Video guidance:
Click here to check the video.
1. Format a USB Drive, and create a new txt file.
2. Rename it to "autel_log".
3. Delete extension name ".txt", choose confirm.
4. Power on the RC and wait for 2 minutes. Then insert the USB Drive into the slot.
5. Wait for 15 minutes (The log will be loaded into the folder automatically). During the waiting, it is recommended to go to the desktop in Remote Controller > Files > Mass USB drive. Check whether the log files are there.
6. Then remove the USB Drive. Connect the USB Drive to PC.
7. Copy the files named [AutelLog-pad.tar] and [AutelLog-rc.tar] and send to us.
[Extract the APP log and Flight Record from Remote Controller] :
Please prepare a USB Drive, or a [USB-AtoC data cable].
1. Via [USB Drive] : Click here to check the video guidance.
1) Turn on the remote controller.
2) Connect the USB drive to RC.
3) Go to the desktop in Remote Controller > Files > RCPad > Android > data > autel.enterprise > files.
4) Select [Copy to] > Select [Mass USB drive] > Copy. In this way, copy the folder named “files” to USB drive.
5) Zip the entire folder named "files" and send it to us.
2. Via [USB-AtoC data cable] :
1) Connect the USB-A port of PC to the USB-C port of RC.
2) Go to the desktop in Remote Controller > Settings > Connected devices > USB > USB preferences > File Transfer
3) An icon named “RCPad” will show up on your computer. Copy below address
[This PC\RCPad\Internal shared storage\Android\data\com.autel.enterprise\files] and find the folder named "files".7.
4) Zip the entire folder named "files" and send it to us.
-
How to extract the logs? (EVO II V3, Lite and Nanoseries)
For EVO II V3, Lite and Nano series :
[Extract flight logs from Aircraft body] :
EVO II V3 Series : Click here for tutorial video
Lite Series : Click here for tutorial video
Nano Series : Click here for tutorial video
Operation Step Guide:
1. Format an SD card, and create a txt file.
2. Rename it to " transmit_log".
3. Delete extension name ".txt", choose confirm
4. Power on the drone and wait for 2 minutes. Then install the SD card into the slot.
5. Wait for 15 minutes (the log will be loaded into the folder automatically).
6. Then remove the SD card.
7. Put the SD card into a card reader.
8. Connect the card reader to your computer. Then you will get the flight log.
Flyaway and Crash
-
My aircraft flew away. What should I do?
If your aircraft got lost during the flight, please contact our customer service support for help.
Please provide below information:
1.The date when the flyaway occurred and how it occurred.
2.Serial number of the aircraft.
3.Upload the flight record and send us the APP account information.
How to upload flight record:
Autel Sky :Click here for tutorial video
Autel Explorer :Click here for tutorial video
Autel Enterprise :Click here for tutorial video
-
My aircraft was crashed. What should I do? (EVO Max series)
If the aircraft is crashed, please contact our customer service for help.
Please provide below information:
1. The date when the crash occurred and how it was crashed.
2.Serial number of the aircraft.
3.Pull the flight log and send to us.
How to extract the flight logs:
EVO Max 4T by APP : Click here for tutorial video
EVO Max 4T by SD card :Click here for tutorial video
Operation Step Guide:
1 Format an SD card, and create a txt file. 2 Rename it to "autel_log". 3 Delete extension name".txt", choose confirm 4 Power on the drone and wait for 2 minutes. Then install the SD card into the slot. 5 Wait for 15 minutes (the log will be loaded into the folder automatically). 6 Then remove the SD card. 7 Put the SD card into a card reader. 8 Connect the card reader to your computer. 9 Then you will get the flight log. 10 For further help, please contact us. -
My aircraft was crashed. What should I do? (EVO II V3、Lite and Nano Series)
If the aircraft is crashed, please contact our customer service for help.
Please provide below information:
1. The date when the crash occurred and how it was crashed.
2.Serial number of the aircraft.
3.Pull the flight log and send to us.
How to extract the flight logs:
EVO II V3 Series : Click here for tutorial video
Lite Series : Click here for tutorial video
Nano Series : Click here for tutorial video
Operation Step Guide:
1 Format an SD card, and create a txt file. 2 Rename it to " transmit_log". 3 Delete extension name".txt", choose confirm 4 Power on the drone and wait for 2 minutes. Then install the SD card into the slot. 5 Wait for 15 minutes (the log will be loaded into the folder automatically). 6 Then remove the SD card. 7 Put the SD card into a card reader. 8 Connect the card reader to your computer. 9 Then you will get the flight log. 10 For further help, please contact us.
Firmware Upgrade by SD card/U disk
-
How to upgrade Firmware by SD card? (EVO II V1, V2, V3, Nano, Lite series)
EVO II V1, V2, and V3 series, Nano, and Lite series :
The firmware upgrade for is done by inserting the SD card into the drone's card slot. There are no separate firmware packages for the drone Aircraft and remote controller. Instead, there is a single firmware package that includes both the drone Aircraft and remote controller firmware versions.
[How to upgrade both aircraft body and remote controller by SD card]:
Video guidance:
Click here to check the video.1. Before update, make sure the drone's battery level is at least 25%.
2. Format the SD card, and copy the installation package to the card.
3. Power on the drone, connect the drone to the remote controller and wait for 2 minutes. Then install the SD card into the slot.
4. The indicators on the arms are flashing, indicating that the update has started.
5. Wait for 15 minutes.
6. If the indicators are steady on, the update is complete.
7. Wait for 2 minutes and power on the drone again.
8. Double click the power button.
9. Link and check the update is successful or not.*Note: Any problems caused by unauthorized firmware changes may require the drone to be sent to the designated repair center for repair.
-
How to upgrade Firmware by SD card? (EVO Max series)
EVO Max series :
The firmware upgrade is done by inserting the SD card into the USB port of the remote controller. The EVO Max series has separate firmware packages for the drone Aircraft and remote controller, and there is no single firmware package that includes both.
[How to upgrade Aircraft by SD card]:
Video guidance:
Click here to check the video.
1. Format an SD card and copy the "ModelX.uav" file into the SD card. (FAT32 or exFAT Format)
2. After 1 minute of powering on the aircraft, insert the SD card into the aircraft.
3. If the aircraft's arm lights start to flash blue or green, it means that it has entered the upgrade mode, usually for 15 minutes.
4. Wait for the upgrade process, until the arm lights stay on, it means the upgrade is successful. If the upgrade fails, you may see the red light on the arm light blinking slowly.
Note: If the aircraft firmware is or below V1.5, it is recommended to change the file name suffix from [xxxxx.uav] to [xxxxx.autel]. If the suffix is changed but the problem persists, please get the aircraft log to us.
[How to upgrade Remote Controller by USB drive/card reader]:
Video guidance:
Click here to check the video.
1. Format a USB drive and copy the "RC79.uav" file into it. (FAT32 or exFAT Format.)
2. Turn on Remote Controller (RC) and wait for 1 minute and then insert USB drive.
3. Click "Confirm" to enter the upgrade interface, and then click "Update All".
4. Wait for the progress bar to 100%. Restart the RC and check the firmware table in Settings.
5. If the upgrade fails, unplug the USB drive, restart RC, and upgrade again.
If you are still unable to update the RC firmware, please take a photo of the error message and contact us.
Note: If the Remote controller firmware is or below V1.5, it is recommended to change the file suffix name from [xxxxxx.uav] to [xxxxxx.autel]. -
Some warning code during upgrade.
If the firmware package cannot be detected or downloaded, try restarting the device and changing the Wi-Fi hotspot or using a mobile network. Ensure a stable internet connection.
If you encounter error codes, refer to the common firmware upgrade error codes and their corresponding solutions. If you still need help, contact customer service and provide the error code.
NO. Common fault codes and corresponding troubleshooting methods CODE_M_4 Response result error; Recovery method: Restart the remote control and the aircraft, then try again. CODE_M_5 The remote control and the aircraft are not connected; Recovery method: Re-pair the frequency between them and try again. CODE_M_2 CODE_M_1 Message parsing error; Recovery method: Restart the remote control and the aircraft, then try again. CODE_M_3 Upgrade response timeout; Recovery method: Restart the remote control and the aircraft, then try again. CODE_20014 Failed to upload the upgrade package; Recovery method: Restart and try again. CODE_20017 The upload progress has not been updated for 2 minutes, indicating a blockage in the upload process; Recovery method: Restart and try again. CODE_10001 Unable to upgrade during flight; Recovery method: Land the aircraft or stop the propellers, then proceed with the upgrade. CODE_10006 Product model mismatch; Recovery method: Please confirm if the current product and the current upgrade package are compatible. CODE_10003 Product package verification failed; Recovery method: Please restart and try again. CODE_10004 Product package file missing; Recovery method: Please restart and try again. -
Firmware upgrade rules of different products.
Aircraft Remote controller Online Upgrade
of Simple Remote Control
(with screen + without screen)
Online Upgrade
of Smart Remote Control
with Screen (6.4" + 7.9")
Upgrade Aircraft
by SD card
Upgrade Aircraft and Remote Controller by SD card
in Aircraft
Upgrade Aircraft by SD card in Remote Controller
Upgrade Remote Controller by SD card in Remote Controller
Upgrade Aircraft and Remote Controller by SD card
in Remote Controller
EVO II V3 Series
6.4 inch Smart control
√
√
√
EVO II V3 Series
7.9 inch Smart control
√
√
√
EVO MAX Series
7.9 inch Smart control
√
√
√
√
√
EVO II V2 Series
7.9 inch Smart control
√
√
√
EVO II V2 Series
Simple Remote Control
(with screen)
√
√
√
Nano Series
Simple Remote Control
(without screen)
√
√
√
Lite Series
Simple Remote Control
(without screen)
√
√
√
Unable to Pair Up Aircraft and Remote Controller
-
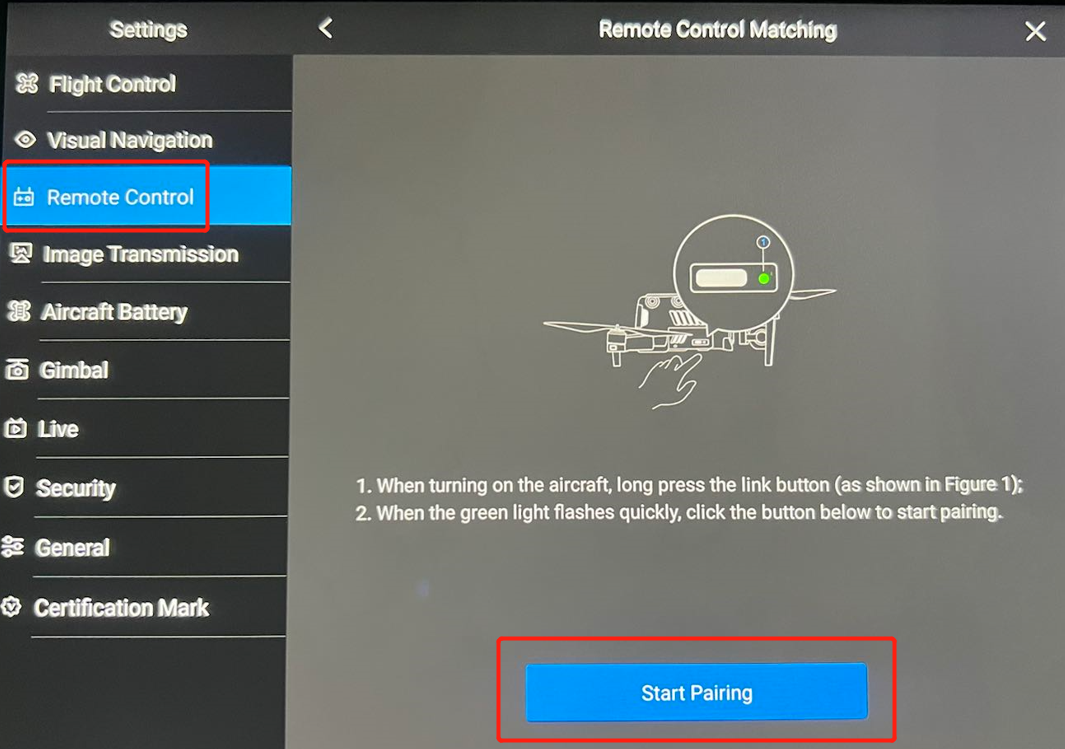
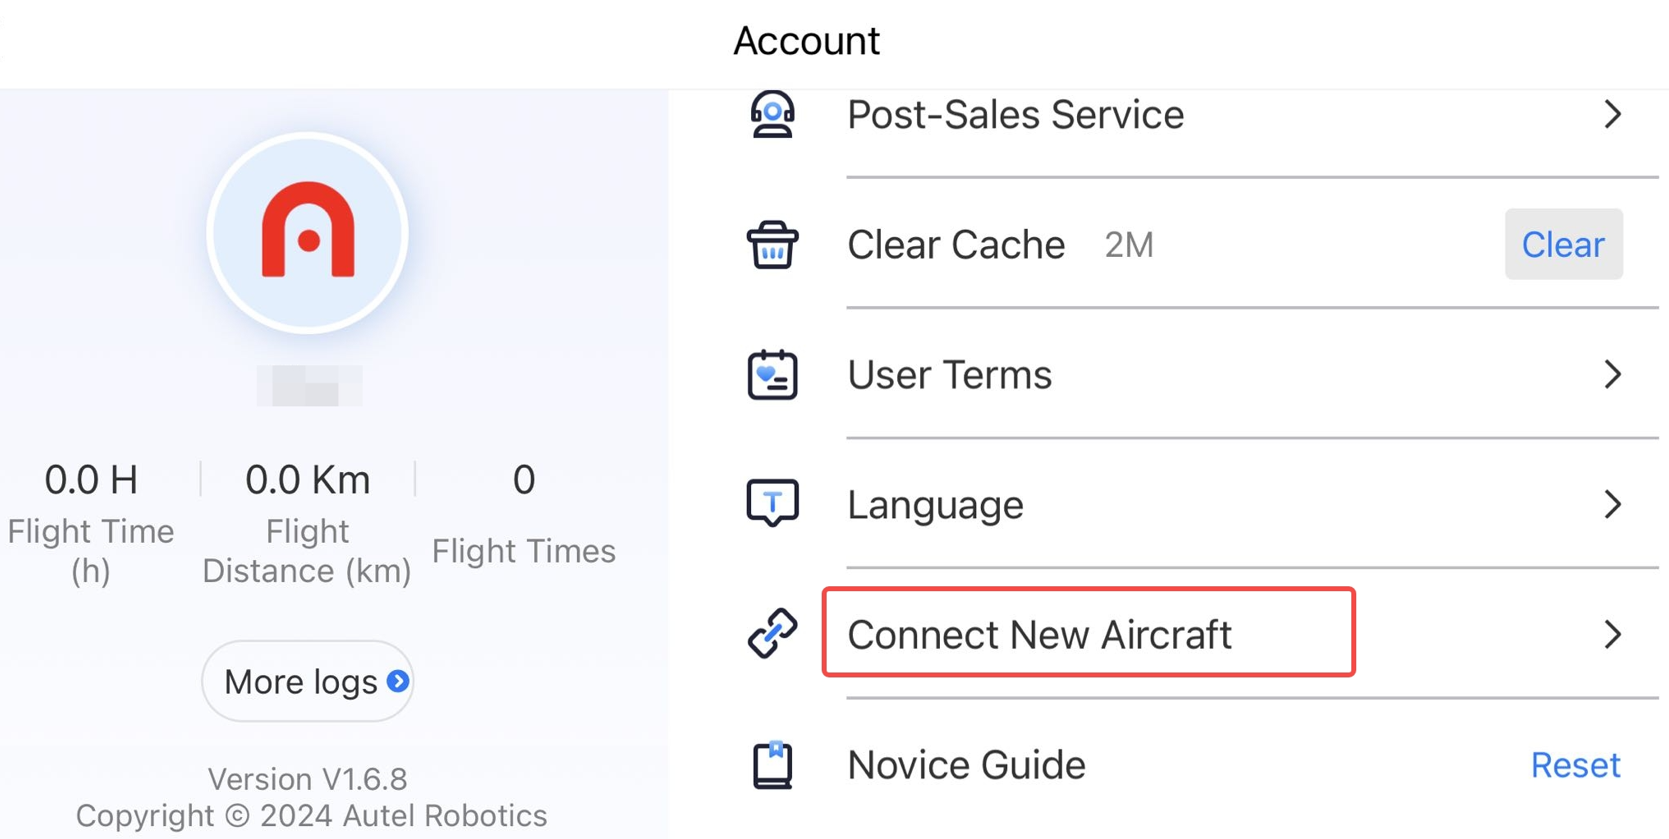
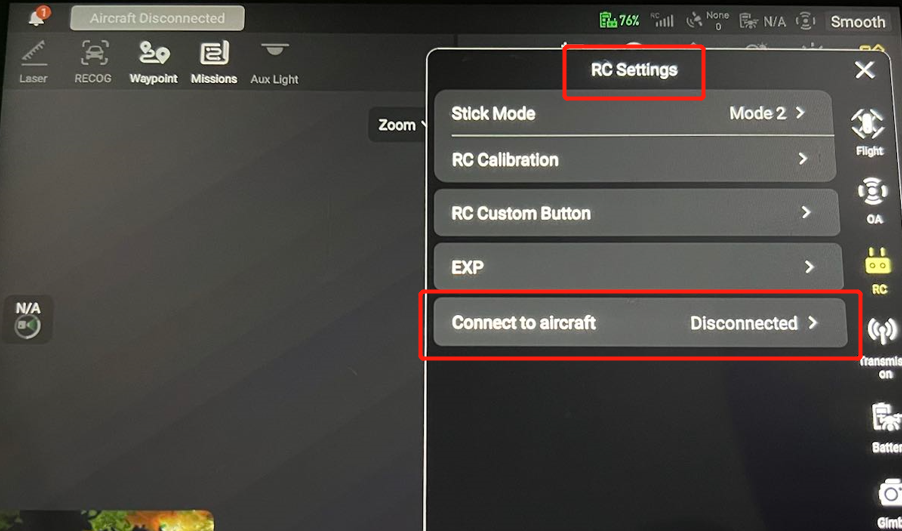
How to pair up (frequency matching) the aircraft body and remote controller by APP?
1. Products that uses the [Autel Explorer APP]
In Autel Explorer APP→Settings→Remote Control→Remote Control Matching→Start Paring.
2. Products that use the [Autel Sky APP]
In the Autel Sky APP→Profile→ Connect New Aircraft and follow the steps.
3. Products that use the [Autel Enterprise APP]
Settings → RC settings → Connect to aircraft.
-
Unable to pair up by APP, what to do?
If the problem of pairing up occurs, it is usually because the image transmission version of the aircraft body and the image transmission version of the remote controller do not belong to the same aircraft firmware versions.
The key method to solve this problem is to upgrade or downgrade the firmware version of the aircraft body or the remote control by SD card to make them belong to the same firmware version.
Click here to check the firmware table for all models
Example of EVO Max 4T:
The image transmission version of the aircraft body is V1.7.0.123, and the firmware version of the aircraft to which it belongs is V1.7.0.123.
The image transmission version of the remote control is V1.6.0.123, and the firmware package version of the aircraft to which it belongs is V1.7.0.123.
Then they belong to the same firmware package version and can be paired up normally.
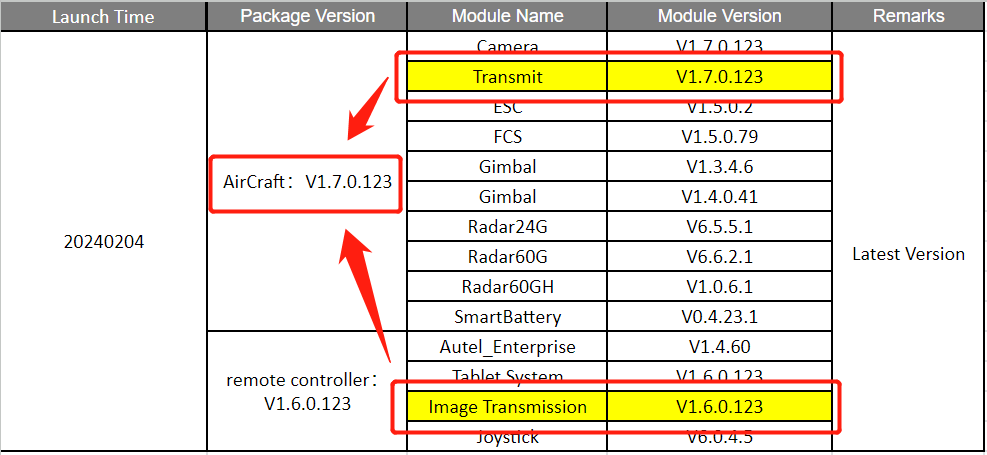
Step 1: Check the image transmission version of the remote control and which firmware package version it belongs to.
Step 2: Upgrade or downgrade the corresponding [ firmware version] by SD card, to make the versions of the aircraft body and the remote controller belong to the same firmware package.
-
How to pair up by the physical buttons of the device?
The operation on the remote control:
For all series of remote controls, you need to press and hold both of the [Power button] and [Home button] at the same time for more than two seconds before turning on the remote control to enter the pairing up mode.
The operation on the aircraft:
For the Max, Lite, and Nano series, please double-click of the [Power button] after startup to enter the frequency matching mode. The EVO II series enters the frequency matching mode by pressing and holding the [frequency matching button] on the fuselage after startup.
-
Unable to pair up by physical button, what to do?
Please check the remote control and the aircraft according to the following steps:
Check the Remote control
Make sure the Power and Home buttons are not damaged by external forces, the buttons have a normal touch, and can rebound normally.
Enter the APP settings to verify whether the remote control can be calibrated. If you find any abnormalities, please directly contact Autel technical support for help.
Check the Aircraft battery
Make sure the battery power button is not damaged by external forces. The button can be touched and rebound normally, and the battery indicator light is normal when pressed.
Enter the APP main interface to check if there is a battery alarm prompt. If you find any abnormalities, please directly contact Autel technical support for help.
Aircraft frequency button check
Make sure the frequency key is not damaged by external forces. The button can be touched and rebound normally, and the indicator light is normal when pressed. If you find any abnormalities, please directly contact Autel technical support for help.
C2 Certification for European Drone Regulation
-
C2 Certification for EVO Max Series
How to apply for the C2 Class Identification Label for EVO Max series:
1. Please click here to submit application.
2. Customer service agent will reach out to you after you submit the application.
For more information, you can check our official website.
Autel Robotics EVO Max Series Achieves C2 Certification, Leading the Way in Drone Compliance
-
C2 Certification for EVO II V3 Series
How to apply for the C2 Class Identification Label for EVO II V3 series:
1. Please click here to submit application.
2. Customer service agent will reach out to you after you submit the application.
For more information, you can check our official website.
Autel Robotics EVO II V3 Series Achieves C2 Certification, Leading the Way in Drone Compliance
EVO II V3 - 1.1.66 Firmware Upgrade Issue
-
During the firmware upgrade, it will display "Failed to send firmware, reboot aircraft and try again."
When you click on [Start Uploading] after downloading the firmware, if it display "Failed to send firmware, reboot aircraft and try again.", please try below solution.
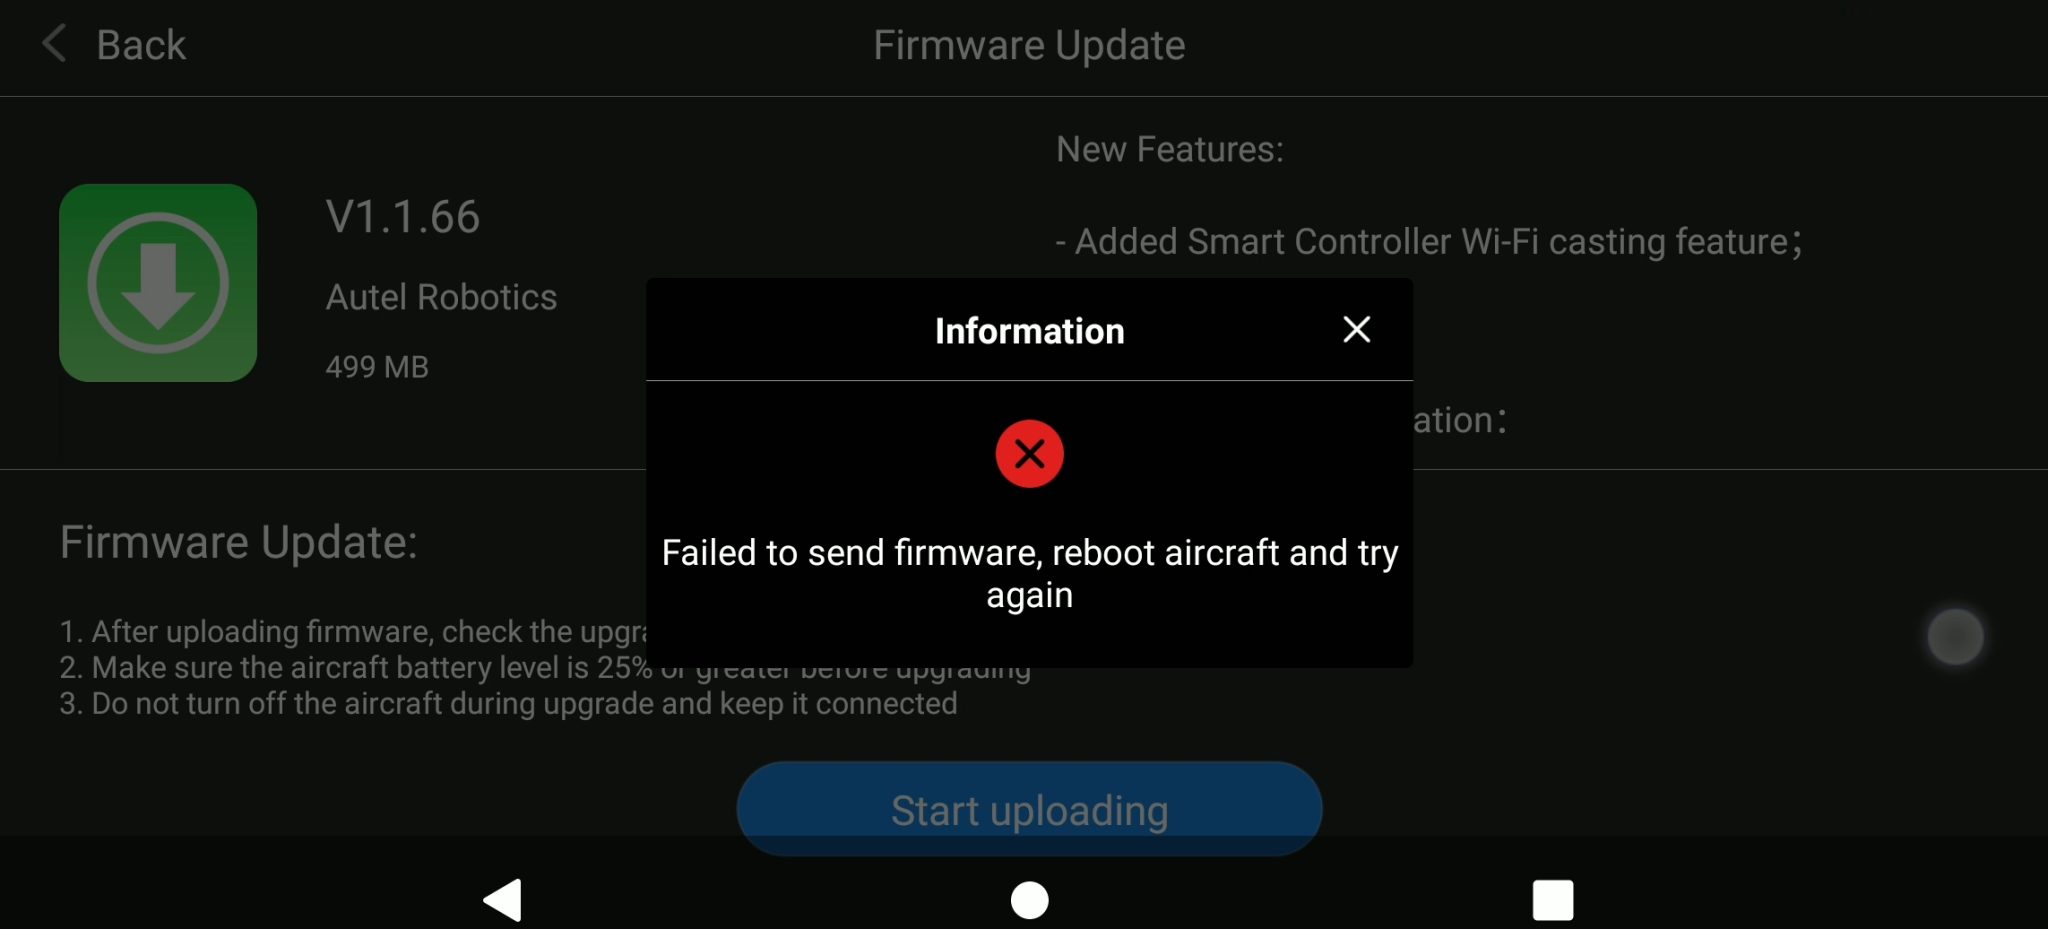
Solution:
Change to a Different Internet Connection.
If the internet IP address is 192.168.1.XX, the connection issue may occur. Please try to switch to a different internet, including using the hotspot.
Turn off Wi-Fi during Uploading Firmware.
Click here to check the video guidance.
1. Make sure the Smart Controller is connected to the internet.
2. Click to Download the firmware from the APP.
3. Once the firmware has been downloaded, [Start Uploading] appears on the controller. Turn off the Wi-Fi on the controller.
4. Once you turn off the Wi-Fi, click [Start Uploading]. It will take about 1 minute and the aircraft’s LED indicator will start flashing rapidly.
Manual Update the firmware by SD card.
1. Download the firmware from the Autel Robotics website (Firmware download).
2. Put the [ModelC.zip] file onto the SD card.
3. Power on both the aircraft and RC and make sure they are paired up.
4. Insert the SD card into the aircraft, and it will start updating. When the aircraft LED indicators start flashing rapidly, it means the aircraft is currently updating.
EVO Max 4T - V1.7.0.51 Firmware Upgrade Issue
-
Upgrade fails or the pairing fails after upgrade. How to fix it?
Please download the firmware package here and upgrade by SD card:
https://drive.google.com/drive/folders/1C6M6VUchOfW-T_xvNHT3vhh5yRs6DDJQ
How to upgrade Aircraft by SD card :
1. Format an SD card and copy the "ModelX.uav" file into it .
2. After 1 minute of powering on the aircraft, insert the SD card into the aircraft.
3. If the aircraft's front arm light flashes blue and the rear arm light flashes green, it means that it has entered the upgrade mode, usually for 15 minutes.
4. Wait for the upgrade process, until the arm light stays on, it means the upgrade is successful. If the upgrade fails, you may see the red light on the arm light blinking slowly.
How to upgrade Remote Controller by U disk(SD card):
1. Format a U disk and copy the "RC79.uav" file into it.
2. Turn on RC and wait for 1 minute and then insert U disk.
3. Click "Confirm" to enter the upgrade interface, and then click "Update All".
4. Wait for the progress bar to scroll to 100%, restart RC, and check whether the RC version has been successfully upgraded to the target version.
5. If the upgrade fails, unplug the USB disk, restart RC, and upgrade again.
If the problem persists, please contact our customer service and provide the serial number of the aircraft and the problem description.
-
The warning error code is 20006 or 10015.
Please restart the aircraft and try to upgrade by OTA again.
-
The warning error code is 10006.
Please contact our customer service, provide the serial number of the aircraft and the problem description.
No Fly Zone
-
How can I unlock the NO FLY ZONE
Please visit below official website to complete the application to unlock the restriction.
-
My aircraft cannot fly in restriction zone after I submitted NFZ application.
1. Your application will be reviewed within 24 hours after the submission. Restriction unlock will be done within 48 hours if the request gets approved.
2. Please make sure your aircraft is in GPS mode when flying.
3. Please check the map in your Autel APP to see whether the current location is in UNLOCK zone.
Live broadcast
-
Which remote live streaming platforms does Autel Explorer APP support?
Platforms that support RTMP live streaming (you can contact the staff of the corresponding live feed platform to confirm whether the platform supports RTMP live streaming)
-
How to use the Live in Autel Explorer APP
Find the Live section in the settings, turn on the Live switch, and paste in the RTMP address obtained from the live feed platform into the "RTMP address"
Taking photos and photography
-
How to get the shooting raw files?
For Nano and Lite series, you can fast download the shooting raw files via WIFI.
For EVO II series, you will need to use a data cable to connect the aircraft and get them.
-
Can I shoot a picture while recording a video ?
Yes, it is supported in Nano and Lite series, while EVO II series do not support.
Others
-
Whether the obstacle avoidance is effective when “Return to Home” is triggered?
In the environment where visual sight and the ambient light is in good condition, the obstacle avoidance takes effect when “Return to Home” is on.
-
Whether the obstacle avoidance still works when it was turned off and the “Return to Home” is on?
The obstacle avoidance, which will turn on when “Return to Home” is triggered, takes effect in the environment where visual sight and the ambient light is in good condition.
-
Does Autel aircraft support multiple control?
Autel aircraft does not support multiple control.
-
I can not activate my Autel Care.
Please ensure your drone is meet with Autel Care activation condition. (Serial number and service key is different.Please distinguish between the number 0 and letter O.)
-
Am i going to use my real-name for registration?
Please follow your local policy to register the drones.
-
Can I use the same account to log in Autel Sky and Autel Explorer ?
Yes, you can use the same account.